This API will Get all of your whatsapp group which previously updated.
If API update whatsapp group list had never been called, this API will always return false.
<?php

$curl = curl_init();

curl_setopt_array($curl, array(
  CURLOPT_URL => 'https://api.fonnte.com/get-whatsapp-group',
  CURLOPT_RETURNTRANSFER => true,
  CURLOPT_ENCODING => '',
  CURLOPT_MAXREDIRS => 10,
  CURLOPT_TIMEOUT => 0,
  CURLOPT_FOLLOWLOCATION => true,
  CURLOPT_HTTP_VERSION => CURL_HTTP_VERSION_1_1,
  CURLOPT_CUSTOMREQUEST => 'POST',
  CURLOPT_HTTPHEADER => array(
    'Authorization: TOKEN'
  ),
));

$response = curl_exec($curl);

curl_close($curl);
echo $response;
If you prefer to see on postman, see here.
TOKEN must be filled by your own token. See how to get token.
Successfull response
{
    "data": [
        {
            "id": "xxx@g.us",
            "name": "Group name 1"
        },
        {
            "id": "xxx-xxx@g.us",
            "name": "Group name 2"
        },
        {
            "id": "xxx@g.us",
            "name": "Group name 3"
        }
    ],
    "status": true
}
- Token invalid : token is not valid
{
    "detail": "token invalid",
    "status": false
}
- Failed to get whatsapp group : There is something wrong with the group data.
{
    "detail": "failed to get whatsapp group",
    "status": false
}
- You have no whatsapp group yet : Either you have never call API update whatsapp group list or you actually haven't join any group yet
{
    "detail": "you have no whatsapp group yet",
    "status": false
}
This API will update all of your joined whatsapp group whether you are admin or not.
This API should called only once : when you are joining new group or never call this API yet.
Abusing this API may lead to whatsapp number ban.
<?php

$curl = curl_init();

curl_setopt_array($curl, array(
  CURLOPT_URL => 'https://api.fonnte.com/fetch-group',
  CURLOPT_RETURNTRANSFER => true,
  CURLOPT_ENCODING => '',
  CURLOPT_MAXREDIRS => 10,
  CURLOPT_TIMEOUT => 0,
  CURLOPT_FOLLOWLOCATION => true,
  CURLOPT_HTTP_VERSION => CURL_HTTP_VERSION_1_1,
  CURLOPT_CUSTOMREQUEST => 'POST',
  CURLOPT_HTTPHEADER => array(
    'Authorization: TOKEN'
  ),
));

$response = curl_exec($curl);

curl_close($curl);
echo $response;
If you prefer to see on postman, see here.
TOKEN must be filled by your own token. See how to get token.
Successfull response
{
    "detail": "update whatsapp group list finished",
    "status": true
}
- Token invalid : token is not valid
{
    "detail": "token invalid",
    "status": false
}
- Cannot fetch with disconnected device : Your device is disconnected, connect your device before proceed
{
    "detail": "cannot fetch with disconnected device",
    "status": false
}
- Failed to fetch whatsapp group list : There is something wrong with your whatsapp number or the server is in trouble.
{
    "detail": "failed to fetch whatsapp group list",
    "status": false
}
- Failed to update : There is something wrong, most likely fonnte's fault. please contact admin for further investigation
{
    "detail": "failed to update",
    "status": false
}
The update is mainly focused on better user experience and add several mini features and ofcourse, bug fixes.
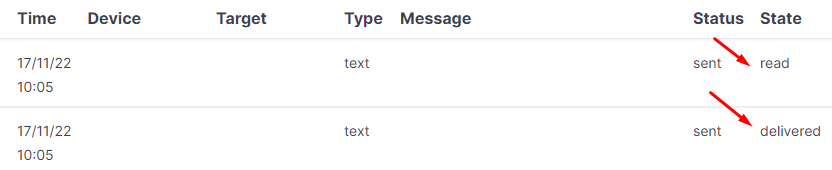
When sending a message, you might want to know whether
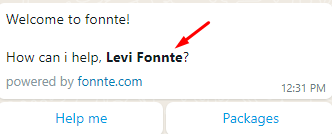
You can now call the name of the recipient directly using variable {name}.
You can now delete your account and your device if not needed.
You will receive an OTP to confirm you want to delete it.
We are adding more notification to disconnected device while having pending messages and webhook failure.
If you have pending messages and somehow your device disconnected, the messages will be in pending state.
these messages will be sent when your device is connected to fonnte.
So if you have pending messages, we will notify you every 4 hours or you can delete all pending in the message history.
And you will get notification whenever you webhook is unreachable for whatever reason.
fix broken download link history
fix multiple keyword autoreply button doesn't replying
fix empty response on button default reply
fix non default button replying with default button
fix case sensitive button autoreply
fix incorrect device's name on invoice
optimize autoreply logic
optimize send media message
update history, report, API message status
A static chatbot is helpful for a questioning user who just want a piece of information.
But for a dynamic information, fonnte's dashboard cannot help you further.
Then, this is where our webhook shine!
You can get all information you need from your own database with webhook.
This tutorial require you to understand basic programing language mainly PHP. If you don't have any experience or don't know what to do, please consider hire a developer.
Special note : any autoreply feature won't work if you are using webhook.
Before you can use this webhook, you need to make an account, login and create a device.
Copy the token as API key to be used on webhook.
Then, connect your device first before you can proceed to send a message.
Please use most recent curl with php version of 7.1++ as requirement.
So making whatsapp chatbot using fonnte's webhook will enable you to use your own database data.
Don't worry, we cannot access your database.
Everyting is coded in your own server.
The only thing we need is your file url.
First, copy this code
<?php
header('Content-Type: application/json; charset=utf-8');

$json = file_get_contents('php://input');
$data = json_decode($json, true);
$device = $data['device'];
$sender = $data['sender'];
$message = $data['message'];
$member= $data['member']; //group member who send the message
$name = $data['name'];
$location = $data['location'];
//data below will only received by device with all feature package
//start
$url =  $data['url'];
$filename =  $data['filename'];
$extension=  $data['extension'];
//end

function sendFonnte($target, $data) {
	$curl = curl_init();

	curl_setopt_array($curl, array(
	  CURLOPT_URL => "https://api.fonnte.com/send",
	  CURLOPT_RETURNTRANSFER => true,
	  CURLOPT_ENCODING => "",
	  CURLOPT_MAXREDIRS => 10,
	  CURLOPT_TIMEOUT => 0,
	  CURLOPT_FOLLOWLOCATION => true,
	  CURLOPT_HTTP_VERSION => CURL_HTTP_VERSION_1_1,
	  CURLOPT_CUSTOMREQUEST => "POST",
	  CURLOPT_POSTFIELDS => array(
	    	'target' => $target,
	    	'message' => $data['message'],
	    	'url' => $data['url'],
	    	'filename' => $data['filename'],
	    ),
	  CURLOPT_HTTPHEADER => array(
	    "Authorization: TOKEN"
	  ),
	));

	$response = curl_exec($curl);

	curl_close($curl);

	return $response;
}

if ( $message == "test" ) {
	$reply = [
		"message" => "working great!",
	];
} elseif ( $message == "image" ) {
	$reply = [
		"message" => "image message",
		"url" => "https://filesamples.com/samples/image/jpg/sample_640%C3%97426.jpg",
	];
} elseif ( $message == "audio" ) {
	$reply = [
	        "message" => "audio message",
		"url" => "https://filesamples.com/samples/audio/mp3/sample3.mp3",
		"filename" => "music",
	];
} elseif ( $message == "video" ) {
	$reply = [
		"message" => "video message",
		"url" => "https://filesamples.com/samples/video/mp4/sample_640x360.mp4",
	];
} elseif ( $message == "file" ) {
	$reply = [
		"message" => "file message",
		"url" => "https://filesamples.com/samples/document/docx/sample3.docx",
		"filename" => "document",
	];
} else {
	$reply = [
		"message" => "Sorry, i don't understand. Please use one of the following keyword :

Hello
Audio
Video
Image
File",
];
}

sendFonnte($sender, $reply);
Function sendFonnte can use any API parameter available on fonnte's API.
You can get the data from database and set as reply message.
Second, save this code and input the file absolute public url to the webhook input.
Example : https://fonnte.com/urlwebhook.php
It's located in menu device->edit.
The last and the most important part is to set autoread to on.
It's located below webhook input.
That's all, your whatsapp bot is now ready to reply with dynamic data.
In a business process, making a customer wait means possible leads are missing.
Sometime the customer just want to know about FAQ and they are too lazy to read on the web.
It's more convenient to ask than to read.
So, making a whatsapp chat bot is vital for your business.
Fonnte provide a way to create whatsapp bot easily.
Every device can be set to be a chatbot.
You need to set autoread to on on device menu->edit.
Fonnte provide a menu to create this bot.
You can access this menu by login to fonnte.
Go to autoreply menu, then you'll see this form
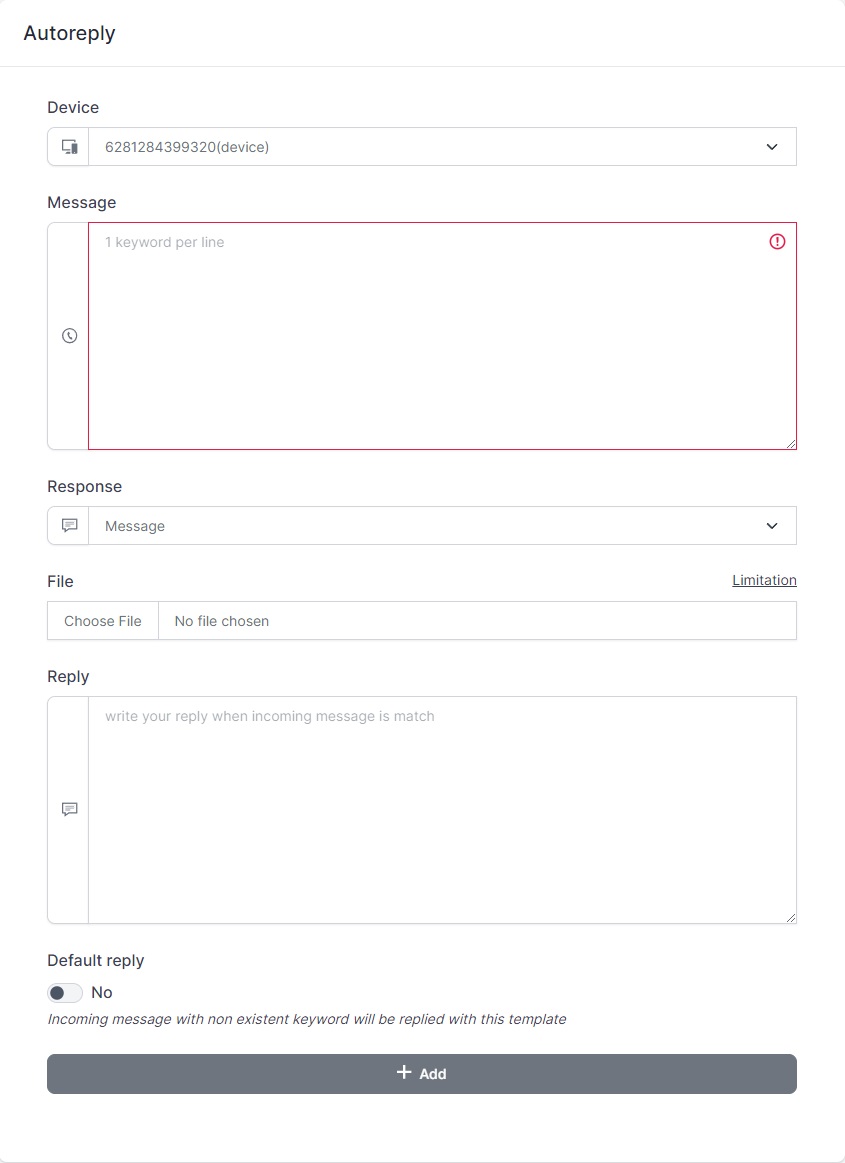
You can make several incoming chat terms on message field.
The response can be just a text, text with file or an interactive buttons.
That's all!
Learn more about this autoreply and button.
With this feature, you can make a static chatbot.
The best usage for this feature is to serve static information like FAQ.
If somehow you want to make a more dynamic whatsapp bot, you can use our other feature, it's called webhook.
We will cover how to create dynamic whatsapp bot in the next tutorial.
Sending whatsapp programatically is hard back then.
Send invoice, notification, confirmation, etc mostly send through email.
As for today, send whatsapp message is possible through API.
Fonnte provide super easy API to send whatsapp message via API.
In this tutorial you will learn how.
This tutorial require you to understand basic programing language mainly PHP. If you don't have any experience or don't know what to do, please consider hire a developer.
Before you can use this API, you need to make an account, login and create a device.
Copy the token as API key to be used on API.
Then, connect your device first before you can proceed to send a message.
Please use most recent curl with php version of 7.1++ as requirement.
Full API reference can be found in the docs and postman.
Target is the number or whatsapp group id who'll receive the message you sent.
If the target is personal, you can just set their whatsapp number as target
If the target is whatsapp group, you have to know the whatsapp group's id.
See tutorial for getting whatsapp group id.
For using fonnte's API, just copy the code below.
Make a file, for example, send.php in your environment (localhost using xampp for example).
Then paste this code.
<?php

$curl = curl_init();

curl_setopt_array($curl, array(
  CURLOPT_URL => 'https://api.fonnte.com/send',
  CURLOPT_RETURNTRANSFER => true,
  CURLOPT_ENCODING => '',
  CURLOPT_MAXREDIRS => 10,
  CURLOPT_TIMEOUT => 0,
  CURLOPT_FOLLOWLOCATION => true,
  CURLOPT_HTTP_VERSION => CURL_HTTP_VERSION_1_1,
  CURLOPT_CUSTOMREQUEST => 'POST',
  CURLOPT_POSTFIELDS => array(
'target' => '08123456789',
'message' => 'test message',
'countryCode' => '62', //optional
),
  CURLOPT_HTTPHEADER => array(
    'Authorization: TOKEN' //change TOKEN to your actual token
  ),
));

$response = curl_exec($curl);
if (curl_errno($curl)) {
  $error_msg = curl_error($curl);
}
curl_close($curl);

if (isset($error_msg)) {
 echo $error_msg;
}
echo $response;
Don't forget to change the target and token and then just run the file in browser.
Then, you're good to go, the message is sent to your target number.
proof of concept example using PHP and MYSQL
<?php

include 'koneksi.php';

//token device
$token = "xxx";


//send message function
function Kirimfonnte($token, $data)
{
    $curl = curl_init();

    curl_setopt_array($curl, array(
        CURLOPT_URL => 'https://api.fonnte.com/send',
        CURLOPT_RETURNTRANSFER => true,
        CURLOPT_ENCODING => '',
        CURLOPT_MAXREDIRS => 10,
        CURLOPT_TIMEOUT => 0,
        CURLOPT_FOLLOWLOCATION => true,
        CURLOPT_HTTP_VERSION => CURL_HTTP_VERSION_1_1,
        CURLOPT_CUSTOMREQUEST => 'POST',
        CURLOPT_POSTFIELDS => array(
            'target' => $data["target"],
            'message' => $data["message"],
        ),
        CURLOPT_HTTPHEADER => array(
            'Authorization: ' . $token
        ),
    ));

    $response = curl_exec($curl);

    curl_close($curl);
    echo $response; //log response fonnte
}

//get user data from database
$res = mysqli_query($db, "SELECT * FROM user");
$row = mysqli_fetch_assoc($res);

$data = [
    "target" => $row["whatsapp"],
    "message" => "Halo " . $row["name"] . ", Terimakasih telah mendaftar di aplikasi kami"
];

//send message
Kirimfonnte($token, $data);
You can send to individual number or whatsapp group by setting the value to the target parameter.
for whatsapp group, you need to get the group id first.
you will need to initialize fetch all the group your whatsapp joined using fetch group.
use fetch only when your whatsapp :
do not overuse it, you might get banned for using it repeatedly.
only after you successfully fetch, you can use get group.
you can use it as you wish, as it's already fetched and does not interact with whatsapp server.
then you will get the whatsapp group id like : 120363379743282885@g.us and this id is used as value on target.
<?php

$curl = curl_init();

curl_setopt_array($curl, array(
  CURLOPT_URL => 'https://api.fonnte.com/send',
  CURLOPT_RETURNTRANSFER => true,
  CURLOPT_ENCODING => '',
  CURLOPT_MAXREDIRS => 10,
  CURLOPT_TIMEOUT => 0,
  CURLOPT_FOLLOWLOCATION => true,
  CURLOPT_HTTP_VERSION => CURL_HTTP_VERSION_1_1,
  CURLOPT_CUSTOMREQUEST => 'POST',
  CURLOPT_POSTFIELDS => array(
'target' => '120363379743282885@g.us',
'message' => 'test message',
),
  CURLOPT_HTTPHEADER => array(
    'Authorization: TOKEN' //change TOKEN to your actual token
  ),
));

$response = curl_exec($curl);
if (curl_errno($curl)) {
  $error_msg = curl_error($curl);
}
curl_close($curl);

if (isset($error_msg)) {
 echo $error_msg;
}
echo $response;note : now there is a better method to solve this problem. see new way
If you really want to send bulk messages, DO NOT USE LOOP!
Unless you want to send multiple url, you are welcome to use loop.
Then how to send bulk messages without loop?
Don't worry, we got your back.
Just use comma separated for each target.
Example : 081xxxxx,082xxxxx.
Here's the code
<?php

$curl = curl_init();

curl_setopt_array($curl, array(
  CURLOPT_URL => 'https://api.fonnte.com/send',
  CURLOPT_RETURNTRANSFER => true,
  CURLOPT_ENCODING => '',
  CURLOPT_MAXREDIRS => 10,
  CURLOPT_TIMEOUT => 0,
  CURLOPT_FOLLOWLOCATION => true,
  CURLOPT_HTTP_VERSION => CURL_HTTP_VERSION_1_1,
  CURLOPT_CUSTOMREQUEST => 'POST',
  CURLOPT_POSTFIELDS => array(
'target' => '08123456789,08987654321',
'message' => 'test message',
'delay' => '2',
'countryCode' => '62', //optional
),
  CURLOPT_HTTPHEADER => array(
    'Authorization: TOKEN' //change TOKEN to your actual token
  ),
));

$response = curl_exec($curl);

curl_close($curl);
echo $response;
You just need to separate each target with comma.
Set 'delay' is highly recommended, it's in second.
In the example above the message will be sent to 628123456789 immediately then wait 2 seconds before send to 628987654321.
you can now use new parameter : data.
parameter data allows you to merge multiple requests as one request.
you can use almost all available parameter.
this way drastically reduce the need of variable and you can define each message on your own.
let's just code it.
<?php

$curl = curl_init();

curl_setopt_array($curl, array(
 CURLOPT_URL => 'https://api.fonnte.com/send',
 CURLOPT_RETURNTRANSFER => true,
 CURLOPT_ENCODING => '',
 CURLOPT_MAXREDIRS => 10,
 CURLOPT_TIMEOUT => 0,
 CURLOPT_FOLLOWLOCATION => true,
 CURLOPT_HTTP_VERSION => CURL_HTTP_VERSION_1_1,
 CURLOPT_CUSTOMREQUEST => 'POST',
 CURLOPT_POSTFIELDS => array('data' => '[{"target": "082227097005", "message": "1","delay":"1"},{"target": "082227097005,082227097005", "message": "2","delay":"2"},{"target": "082227097005", "message": "3","delay":"0"}]'
),
 CURLOPT_HTTPHEADER => array(
 'Authorization: TOKEN' //change TOKEN to your actual token
 ),
));

$response = curl_exec($curl);

curl_close($curl);
echo $response;
the code above will send message 1 immediately -> wait 2 seconds -> send message 2 -> wait 2 seconds -> send message 2 -> send message 3
proof of concept example using PHP and MYSQL
<?php

include 'koneksi.php';

//token device
$token = "xxx";


//function send message
function Kirimfonnte($token, $data)
{
    $curl = curl_init();

    curl_setopt_array($curl, array(
        CURLOPT_URL => 'https://api.fonnte.com/send',
        CURLOPT_RETURNTRANSFER => true,
        CURLOPT_ENCODING => '',
        CURLOPT_MAXREDIRS => 10,
        CURLOPT_TIMEOUT => 0,
        CURLOPT_FOLLOWLOCATION => true,
        CURLOPT_HTTP_VERSION => CURL_HTTP_VERSION_1_1,
        CURLOPT_CUSTOMREQUEST => 'POST',
        CURLOPT_POSTFIELDS => array(
            'data' => $data['data'],
        ),
        CURLOPT_HTTPHEADER => array(
            'Authorization: ' . $token
        ),
    ));

    $response = curl_exec($curl);

    curl_close($curl);
    echo $response; //log response fonnte
}

//ambil data user dari database
$res = mysqli_query($db, "SELECT * FROM user");

//looping data user
$alldata = [];
while ($row = mysqli_fetch_assoc($res)) {
    $data = [
        "target" => $row["whatsapp"],
        "message" => "Halo " . $row["name"] . ", Terimakasih telah mendaftar di aplikasi kami",
        "delay" => "1-3", //add delay to control sending message speed
    ];
    array_push($alldata, $data);
}

//request data
$data = [
    "data" => json_encode($alldata), //transform array to json (string)
];

//send message
Kirimfonnte($token, $data);
The message can also be sent in a scheduled time.
Pass the parameter 'schedule' with value of unix timestamp down to second, not to milisecond.
For example : 1667433600 for November 3rd, 2022 12:00:00 AM (GMT +0)
In indonesian time, the time above will run on :
So this is the code
<?php

$curl = curl_init();

curl_setopt_array($curl, array(
  CURLOPT_URL => 'https://api.fonnte.com/send',
  CURLOPT_RETURNTRANSFER => true,
  CURLOPT_ENCODING => '',
  CURLOPT_MAXREDIRS => 10,
  CURLOPT_TIMEOUT => 0,
  CURLOPT_FOLLOWLOCATION => true,
  CURLOPT_HTTP_VERSION => CURL_HTTP_VERSION_1_1,
  CURLOPT_CUSTOMREQUEST => 'POST',
  CURLOPT_POSTFIELDS => array(
'target' => '08123456789',
'message' => 'test message',
'schedule' => 1667433600,
'countryCode' => '62', //optional
),
  CURLOPT_HTTPHEADER => array(
    'Authorization: TOKEN' //change TOKEN to your actual token
  ),
));

$response = curl_exec($curl);

curl_close($curl);
echo $response;
That's all.
The message will be sent on scheduled time.
proof of concept example using PHP and MYSQL
<?php

include 'koneksi.php';

//token device
$token = "xxx";


//function send message
function Kirimfonnte($token, $data)
{
    $curl = curl_init();

    curl_setopt_array($curl, array(
        CURLOPT_URL => 'https://api.fonnte.com/send',
        CURLOPT_RETURNTRANSFER => true,
        CURLOPT_ENCODING => '',
        CURLOPT_MAXREDIRS => 10,
        CURLOPT_TIMEOUT => 0,
        CURLOPT_FOLLOWLOCATION => true,
        CURLOPT_HTTP_VERSION => CURL_HTTP_VERSION_1_1,
        CURLOPT_CUSTOMREQUEST => 'POST',
        CURLOPT_POSTFIELDS => array(
            'target' => $data['target'],
            'message' => $data['message'],
            'schedule' => $data['schedule'],
        ),
        CURLOPT_HTTPHEADER => array(
            'Authorization: ' . $token
        ),
    ));

    $response = curl_exec($curl);

    curl_close($curl);
    echo $response; //log response fonnte
}

//get user data from database
$res = mysqli_query($db, "SELECT * FROM user");

$row = mysqli_fetch_assoc($res);
$schedule = strtotime($row["schedule"] . $row["timezone"]);
$data = [
    "target" => $row["whatsapp"],
    "message" => "Halo " . $row["name"] . ", jangan lupa untuk mengikuti webinar hari ini ya",
    "schedule" => $schedule,
];

// send message
Kirimfonnte($token, $data);
So after successfully send message, There is another wish.
"i want to send this message personally".
Well, ofcourse it's possible!
First option is not using fonnte's API feature (not recommended).
You are making n request to fonnte.
Even fonnte does not have problem with it, we have a better solution!
Second option is using fonnte's API feature (highly recommended).
To send dynamic messages, you can use variables.
To use it, you need to set the variables on 'target', and use the variable on 'message'
Here's the code
<?php

$curl = curl_init();

curl_setopt_array($curl, array(
  CURLOPT_URL => 'https://api.fonnte.com/send',
  CURLOPT_RETURNTRANSFER => true,
  CURLOPT_ENCODING => '',
  CURLOPT_MAXREDIRS => 10,
  CURLOPT_TIMEOUT => 0,
  CURLOPT_FOLLOWLOCATION => true,
  CURLOPT_HTTP_VERSION => CURL_HTTP_VERSION_1_1,
  CURLOPT_CUSTOMREQUEST => 'POST',
  CURLOPT_POSTFIELDS => array(
'target' => '08123456789|Fonnte|Admin,08987654321|Lily|Client',
'message' => 'test message to {name} as {var1}',
'delay' => '2',
'countryCode' => '62', //optional
),
  CURLOPT_HTTPHEADER => array(
    'Authorization: TOKEN' //change TOKEN to your actual token
  ),
));

$response = curl_exec($curl);

curl_close($curl);
echo $response;
That code will send message to with 2 seconds delay for each message
Separate each variable with pipe (|).
The first variable will using {name} and the rest is using {var1},{var2},...
This is great! you can send personalized messages with one go.
How much can i make the variable? as much as you need, ofcourse!
You can learn more about it on about variable page.
note : this parameter only available on super/advanced/ultra plan.
Can i add message with attachment like image? or video? file like pdf, excel, docs? and audio?
Yes you can!
<?php

$curl = curl_init();

curl_setopt_array($curl, array(
  CURLOPT_URL => 'https://api.fonnte.com/send',
  CURLOPT_RETURNTRANSFER => true,
  CURLOPT_ENCODING => '',
  CURLOPT_MAXREDIRS => 10,
  CURLOPT_TIMEOUT => 0,
  CURLOPT_FOLLOWLOCATION => true,
  CURLOPT_HTTP_VERSION => CURL_HTTP_VERSION_1_1,
  CURLOPT_CUSTOMREQUEST => 'POST',
  CURLOPT_POSTFIELDS => array(
'target' => '08123456789',
'message' => 'test message',
'url' => 'https://md.fonnte.com/images/logo-dashboard.png',
'filename' => 'my-file.pdf', //optional, only works on file and audio
'countryCode' => '62', //optional
),
  CURLOPT_HTTPHEADER => array(
    'Authorization: TOKEN' //change TOKEN to your actual token
  ),
));

$response = curl_exec($curl);

curl_close($curl);
echo $response;
That's it, you can now send the message with an image!
local file is supported using file parameter file
the path must correct otherwise you will get error : operation aborted by callback.
<?php

$curl = curl_init();

curl_setopt_array($curl, array(
  CURLOPT_URL => 'https://api.fonnte.com/send',
  CURLOPT_RETURNTRANSFER => true,
  CURLOPT_ENCODING => '',
  CURLOPT_MAXREDIRS => 10,
  CURLOPT_TIMEOUT => 0,
  CURLOPT_FOLLOWLOCATION => true,
  CURLOPT_HTTP_VERSION => CURL_HTTP_VERSION_1_1,
  CURLOPT_CUSTOMREQUEST => 'POST',
  CURLOPT_POSTFIELDS => array(
'target' => '08123456789',
'message' => 'test message',
'file' => new CURLFile("localfile.png"),
'filename' => 'my-file.pdf', //optional, only works on file and audio
'countryCode' => '62', //optional
),
  CURLOPT_HTTPHEADER => array(
    'Authorization: TOKEN' //change TOKEN to your actual token
  ),
));

$response = curl_exec($curl);

curl_close($curl);
echo $response;
That's it, you can now send the file via your own local file.
You can also send directly from a form upload.
this is super beneficial that you don't have to save it to your local/server first.
<?php
//logic
$file = $_FILES["file"]["tmp_name"]; //change "file" with your actual file input name tag
$name = $_FILES["file"]["name"];
$curl = curl_init();

curl_setopt_array($curl, array(
  CURLOPT_URL => 'https://api.fonnte.com/send',
  CURLOPT_RETURNTRANSFER => true,
  CURLOPT_ENCODING => '',
  CURLOPT_MAXREDIRS => 10,
  CURLOPT_TIMEOUT => 0,
  CURLOPT_FOLLOWLOCATION => true,
  CURLOPT_HTTP_VERSION => CURL_HTTP_VERSION_1_1,
  CURLOPT_CUSTOMREQUEST => 'POST',
  CURLOPT_POSTFIELDS => array(
'target' => '08123456789',
'message' => 'test message',
'file' => new CURLFile($file, '', $name),
'filename' => 'my-file.pdf', //optional, only works on file and audio
'countryCode' => '62', //optional
),
  CURLOPT_HTTPHEADER => array(
    'Authorization: TOKEN' //change TOKEN to your actual token
  ),
));

$response = curl_exec($curl);

curl_close($curl);
echo $response;
you can utilize fonnte api to suits your need.
proof of concept example using PHP and MYSQL
<?php

include 'koneksi.php';

$url = "files/Sertifikat.pdf";
$filename = "Sertifikat1.pdf";
if (isset($_POST["submit"])) {
    $url = $_FILES['file']['tmp_name'];
    $filename = $_FILES['file']['name'];
}

//token device
$token = "SdPaBABamBanDYiukDVY";


//function send message
function Kirimfonnte($token, $data)
{
    $curl = curl_init();

    curl_setopt_array($curl, array(
        CURLOPT_URL => 'https://api.fonnte.com/send',
        CURLOPT_RETURNTRANSFER => true,
        CURLOPT_ENCODING => '',
        CURLOPT_MAXREDIRS => 10,
        CURLOPT_TIMEOUT => 0,
        CURLOPT_FOLLOWLOCATION => true,
        CURLOPT_HTTP_VERSION => CURL_HTTP_VERSION_1_1,
        CURLOPT_CUSTOMREQUEST => 'POST',
        CURLOPT_POSTFIELDS => $data,
        CURLOPT_HTTPHEADER => array(
            'Authorization: ' . $token
        ),
    ));

    $response = curl_exec($curl);

    if (curl_errno($curl)) {
        echo 'Error:' . curl_error($curl);
    }

    curl_close($curl);
    echo $response; //log response fonnte
}

//get user data from database
$res = mysqli_query($db, "SELECT * FROM user WHERE id = 1");

$row = mysqli_fetch_assoc($res);
$data = [
    "target" => $row["whatsapp"],
    "message" => "Halo " . $row["name"] . ", berikut sertifikat kamu ya",
    // "url" => $row["url"],
    "file" => new CURLFile($url, "", $filename)
];

// send message
Kirimfonnte($token, $data);

?>

<!DOCTYPE html>
<html lang="en">

<head>
    <meta charset="UTF-8">
    <meta name="viewport" content="width=device-width, initial-scale=1.0">
    <title>Form</title>
</head>

<body>
    <form action="" method="POST" enctype="multipart/form-data">
        <input type="file" name="file" id="file">
        <button type="submit" name="submit">Kirim</button>
    </form>
</body>

</html>
The next 3 message types is used for interactive purpose. (deprecated)
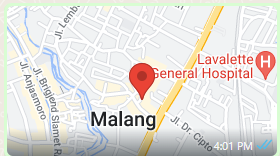
Location can be send using latitude and longitude.
the format should be latitude,longitude.
<?php

$curl = curl_init();

curl_setopt_array($curl, array(
  CURLOPT_URL => 'https://api.fonnte.com/send',
  CURLOPT_RETURNTRANSFER => true,
  CURLOPT_ENCODING => '',
  CURLOPT_MAXREDIRS => 10,
  CURLOPT_TIMEOUT => 0,
  CURLOPT_FOLLOWLOCATION => true,
  CURLOPT_HTTP_VERSION => CURL_HTTP_VERSION_1_1,
  CURLOPT_CUSTOMREQUEST => 'POST',
  CURLOPT_POSTFIELDS => array(
'target' => '08123456789',
'location' => '-7.983908, 112.621391',

),
  CURLOPT_HTTPHEADER => array(
    'Authorization: TOKEN' //change TOKEN to your actual token
  ),
));

$response = curl_exec($curl);

curl_close($curl);
echo $response;
You can change the location value with your desired location.
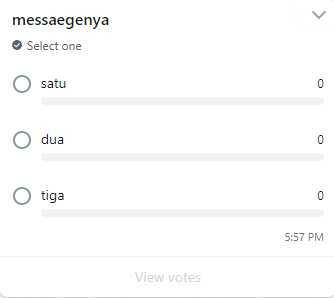
You can send whatsapp poll message to your recipients.
The poll may be sent to group or individual.
<?php

$curl = curl_init();

curl_setopt_array($curl, array(
  CURLOPT_URL => 'https://api.fonnte.com/send',
  CURLOPT_RETURNTRANSFER => true,
  CURLOPT_ENCODING => '',
  CURLOPT_MAXREDIRS => 10,
  CURLOPT_TIMEOUT => 0,
  CURLOPT_FOLLOWLOCATION => true,
  CURLOPT_HTTP_VERSION => CURL_HTTP_VERSION_1_1,
  CURLOPT_CUSTOMREQUEST => 'POST',
  CURLOPT_POSTFIELDS => array('target' => '082227097005','message' => 'test dari postman','choices' => 'satu,dua,tiga','select' => 'single','pollname' => 'pollku'),
  CURLOPT_HTTPHEADER => array(
    'Authorization: TOKEN'
  ),
));

$response = curl_exec($curl);

curl_close($curl);
echo $response;
You can change the data to your personal needs.
you can change the behaviour of sending message as a sequence.
this means, the order of messages matters.
it's as simple as adding 'sequence' => true.
this parameter works both on data or target.
<?php

$curl = curl_init();

curl_setopt_array($curl, array(
  CURLOPT_URL => 'https://api.fonnte.com/send',
  CURLOPT_RETURNTRANSFER => true,
  CURLOPT_ENCODING => '',
  CURLOPT_MAXREDIRS => 10,
  CURLOPT_TIMEOUT => 0,
  CURLOPT_FOLLOWLOCATION => true,
  CURLOPT_HTTP_VERSION => CURL_HTTP_VERSION_1_1,
  CURLOPT_CUSTOMREQUEST => 'POST',
  CURLOPT_POSTFIELDS => array('data' => '[
{"target": "082227097005", "message": "1","delay" : "0"},
{"target": "082227097005", "message": "2","delay" : "0"},
{"target": "082227097005", "message": "3","delay" : "0","url":"https://fonnte.com/wp-content/uploads/2023/03/Logo-Fonnte-1536x368.png"},
{"target": "082227097005", "message": "4","delay" : "0"},
{"target": "082227097005", "message": "5","delay" : "0"}
]',
'sequence'=>true),
  CURLOPT_HTTPHEADER => array(
    'Authorization: TOKEN'
  ),
));

$response = curl_exec($curl);

curl_close($curl);
echo $response;
This code will send the message in sequence : a,b,c,d,e
Fonnte provide many configuration to make the API as flexible as possible.
If you are not a programmer or confuse how to do it, you can hire a programmer or just use fonnte's dashboard to send whatsapp message.
We have cover all this way to send message in our dashboard.
In the end, it's not only meant for sending, you can also reply the message.
We'll cover in autoreply tutorial on how to create a whatsapp chat bot.
The update is mainly focused on button ui and add several mini features and ofcourse, bug fixes.
You can now make button with fonnte's dashboard.
It's reusable and one time.

You can use this button for sending message or creating an autoreply.
Your whatsapp message will be much more engaging!
Learn how to create this button.
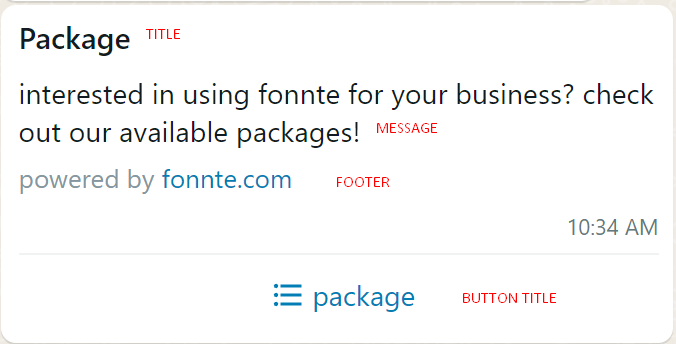
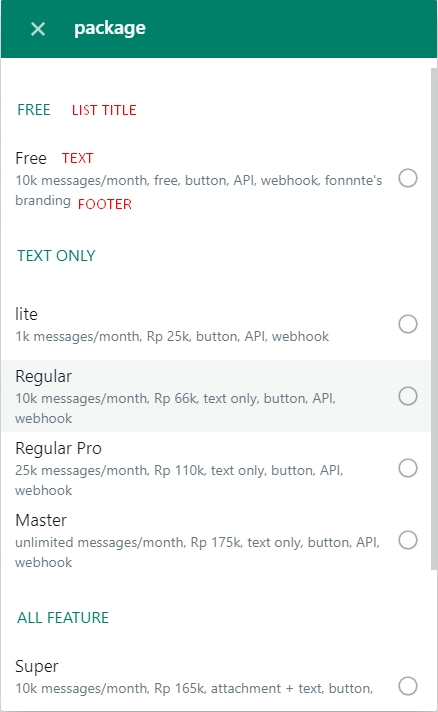
You can now order a package by whatsapp. you are no longer needed to login just to order!
See how to order on the video below.
We add an API to check how much messages an account have been requested to fonnte.
you can see here.
We also add total messages requested on each device on device profile API.
This feature has been deprecated and no longer maintained. this page is no longer show on menu and no longer usable. all information below are no longer valid
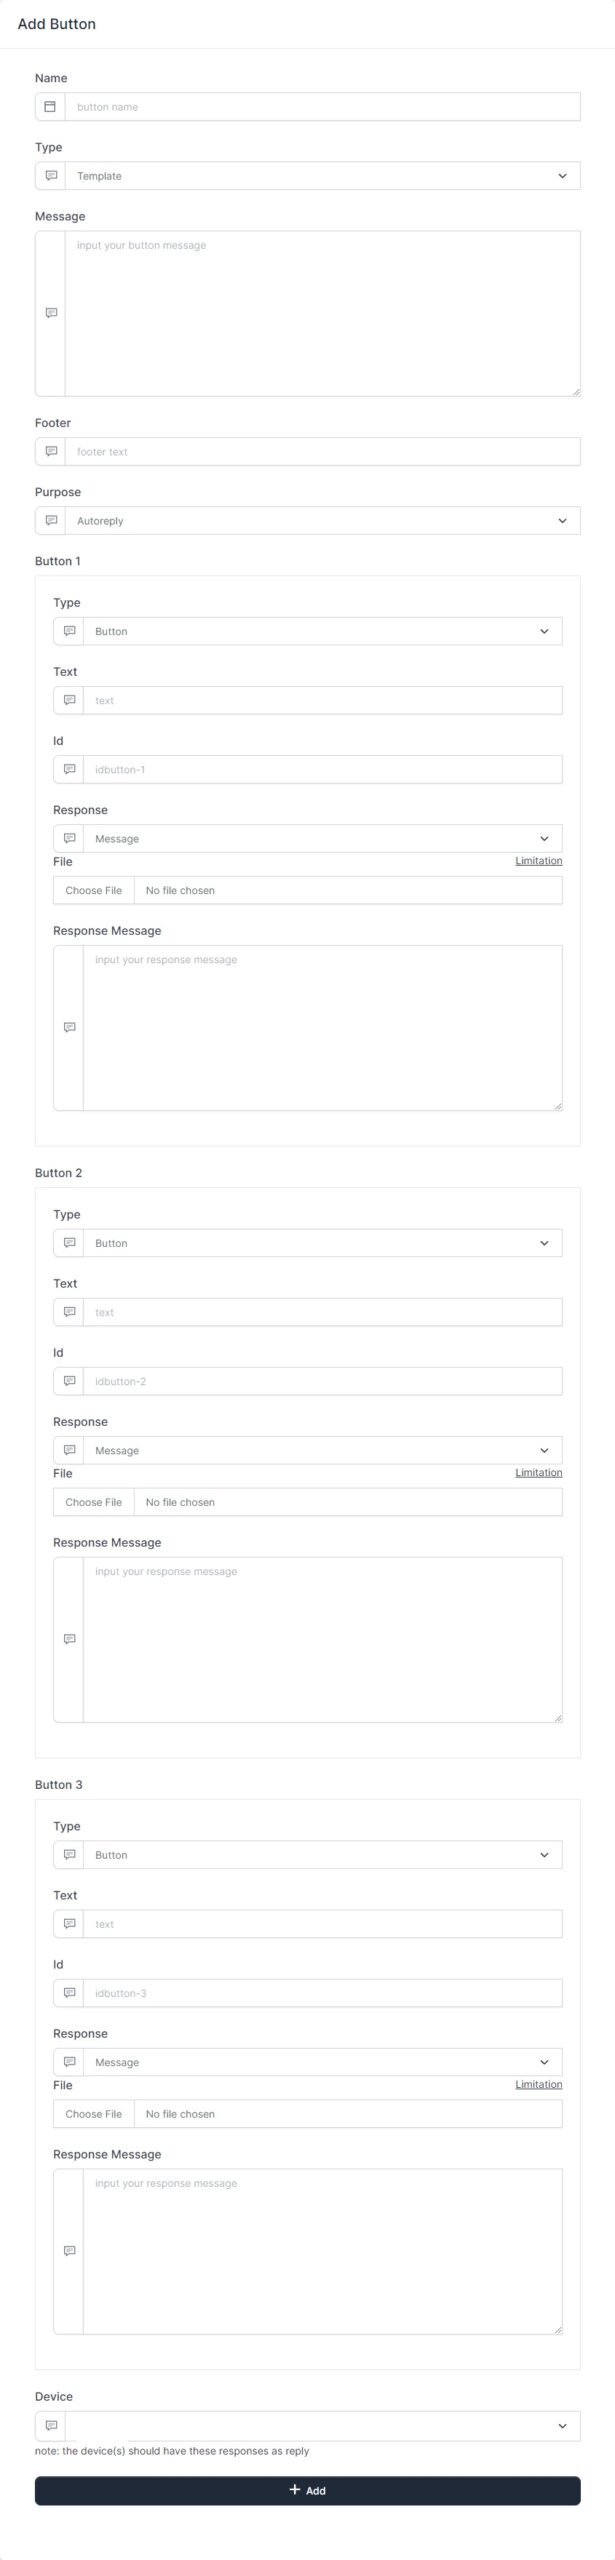
You can now create button on fonnte's dashboard.
There are 3 buttons in total
The fields of button is shown above.
You can see the image below for what these fields used for

This type of button does not send to iphone.
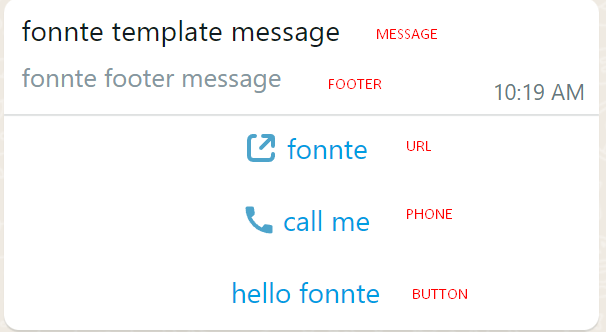
The fields of template is shown above.
You can see the image below for what these fields used for
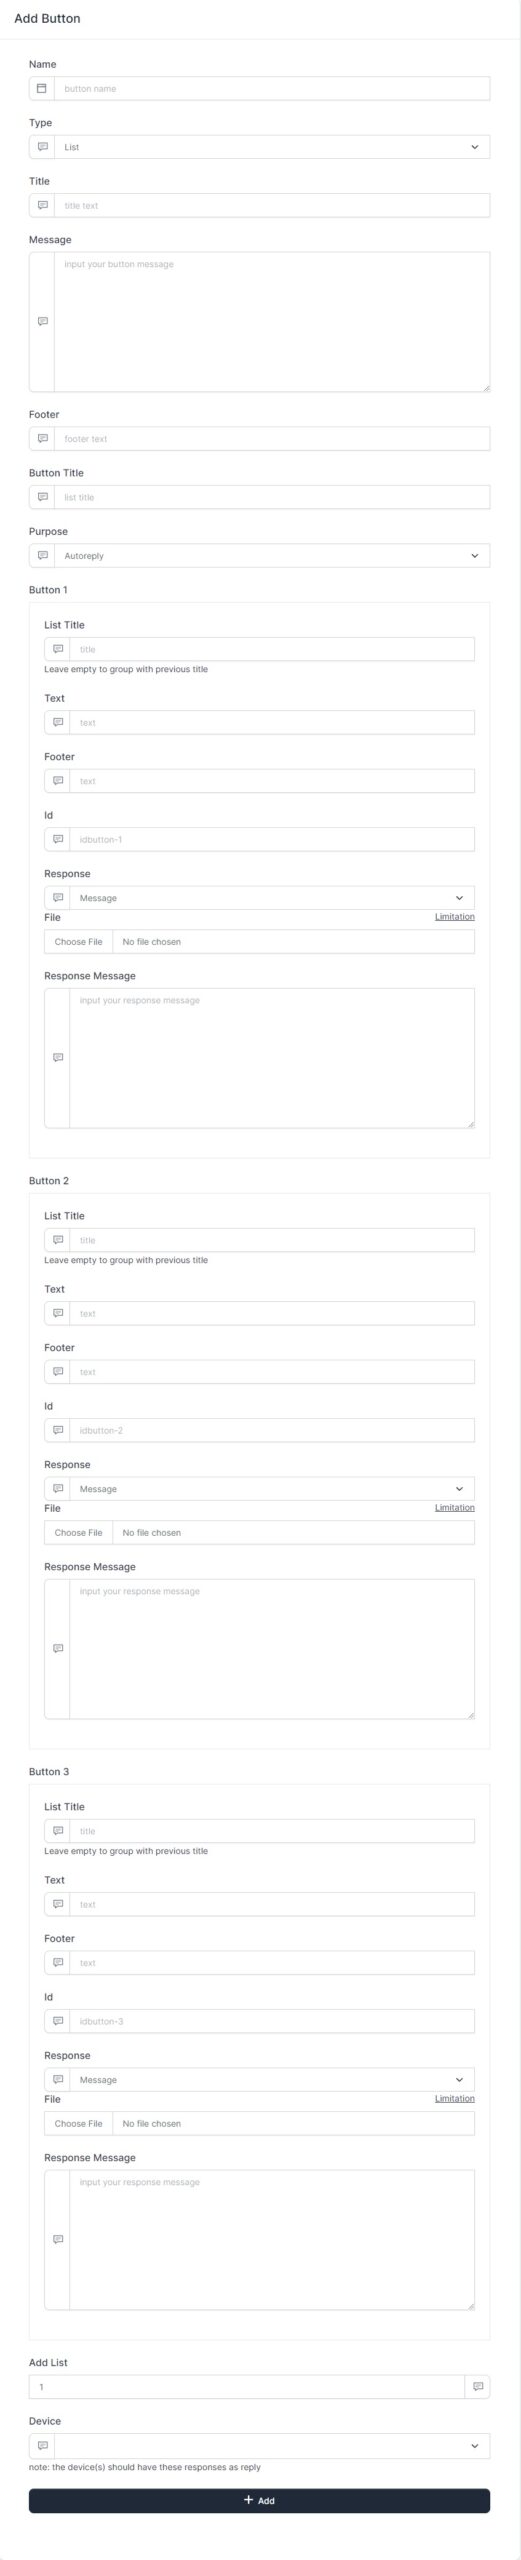
The fields of list is shown above.
You can see the image below for what these fields used for
Send whatsapp message without code is easy.
You can use fonnte to send the message.
This is the easiest way to send message, but have less control.
You are restricted to what fonnte's dashboard offer.
But still, it's the easiest one, even if you can't code, this will work well.
You can access this by login to fonnte.
Go to send menu, then you'll see this form
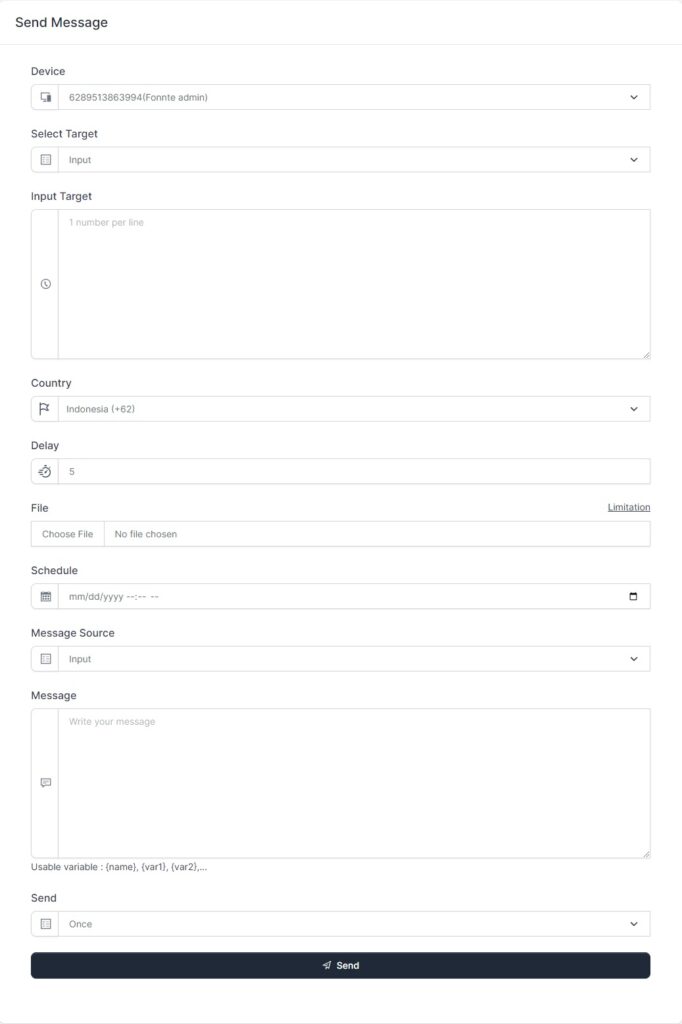
You can send a message just by filling input target and the message.
For example :
Then your connected device will send to 6282227097005 with message "Hello".
Pretty easy, right?
You can find the detail about it in send message menu.
The next section will cover how to send whatsapp message with PHP.
Variable enable your messages to be personalized sent to each target.
With fonnte, you can create unlimited variables for each target.
Available variables are
There is 3 ways in fonnte to use variable, but only 1 way to save variable for later usage.
To use variable, there is 3 way to do this
Example for sending variable to multiple number :
The messages will be sent to 6282227097005 with message Hello Fonnte! You are login as Admin from Indonesia and 628123456789 with message Hello Susi! You are login as User from Malaysia