We are adding rotator option for the the recipient.
You can forward incoming message or split the leads when a client fill a form using API.
You can now use full power of autoreply fonnte.
Similar to forward rotator, you can now forward incoming text to a specific number.
You can only forward on default message.
It's pointless to forward text which is the same as keyword.
Fonnte adding a menu to make a partnership with you.
This is an opportunity for you to make more clients and more money.
Your product / service will be shown at partner's page.
But this is limited to a product/service which require their clients to use their own token.
add autoresend to group when failed.
fix missing validation on button url.
fix autorepy button type.
Rotator is a feature that allows you to send messages randomly according to the weight of each number.
This feature primarily used to split leads from a form, button or another method.
You can use it for autoreply (default only) and send message (API only).
To create the rotator, you can go to rotator menu.
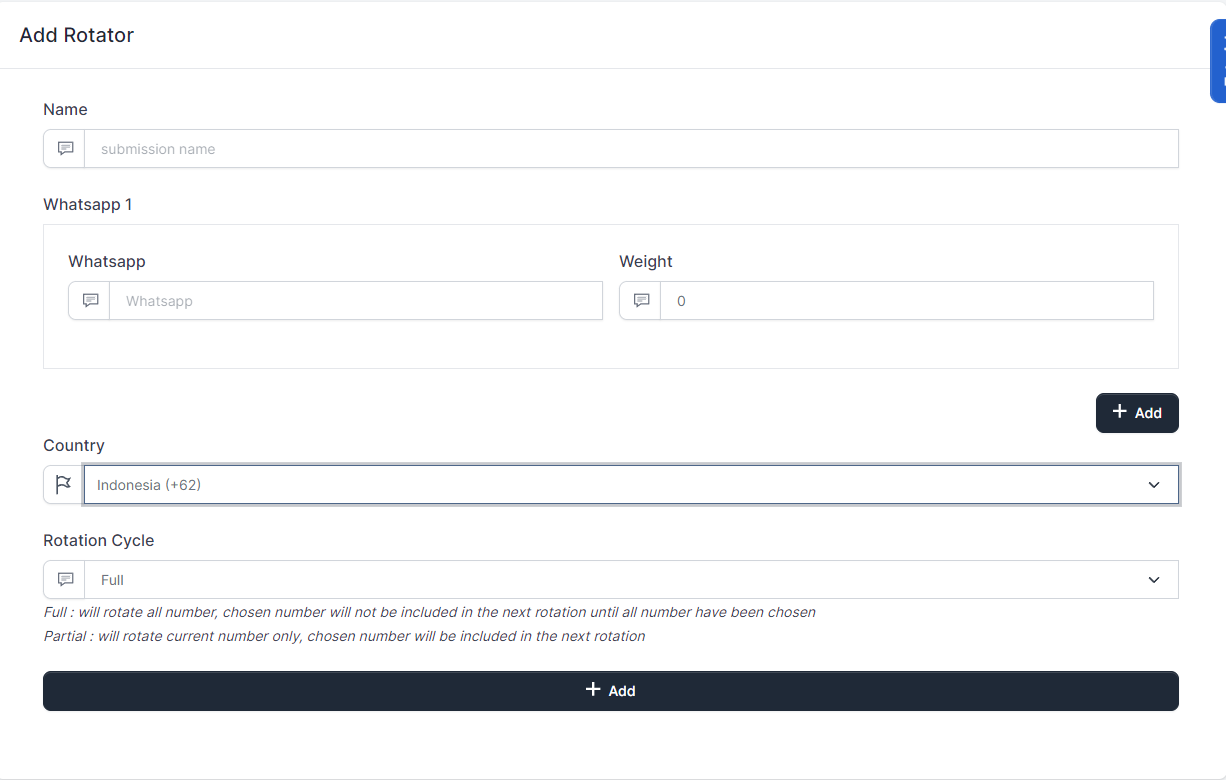
The fields of rotator is shown above.
After you finish adding the rotator, you can click add and the rotator will be added and ready to use.
You can use it on autoreply with default reply enabled or using rotator API as target with rotator id
This API will Get all of your rotator list.
<?php

$curl = curl_init();

curl_setopt_array($curl, array(
  CURLOPT_URL => 'https://api.fonnte.com/rotator',
  CURLOPT_RETURNTRANSFER => true,
  CURLOPT_ENCODING => '',
  CURLOPT_MAXREDIRS => 10,
  CURLOPT_TIMEOUT => 0,
  CURLOPT_FOLLOWLOCATION => true,
  CURLOPT_HTTP_VERSION => CURL_HTTP_VERSION_1_1,
  CURLOPT_CUSTOMREQUEST => 'POST',
  CURLOPT_HTTPHEADER => array(
    'Authorization: TOKEN'
  ),
));

$response = curl_exec($curl);

curl_close($curl);
echo $response;
If you prefer to see on postman, see here.
TOKEN must be filled by your own token. See how to get token.
Successfull response
{
    "data": [
        {
            "id": "rotator#1",
            "name": "1"
        }
    ],
    "status": true
-Unknown user : your username is invalid, try relogin
{
    "detail": "unknown user",
    "status": false
}
- Error fetching rotator : There is something wrong with the rotator data.
{
    "detail": "error fetching rotator",
    "status": false
}
- No rotator yet : You haven't create any rotator yet
{
    "detail": "no rotator yet",
    "status": false
}We are adding rotator option for the sender.
You can use multiple device/token to send to several target numbers, so it will randomize the sender and lower the chance of getting banned.
Submission menu is newly added feature.
This feature enable you to create a form that actually works on whatsapp.
You can get your customer data fast and easy.
Read more at submission documentation.
Fonnte sending more data to be used by your webhook.
Read more at webhook documentation.
Now you can save the attachment that has been received by your whatsapp bot.
Note : the attachment will follow the file limitation rule and require device with all feature package.
Read more at download attachment documentation.
Fonnte always use fixed delay to multiple target number which make the sending have a certain rhytm.
to make it more like human and less like bot, we are implementing random delay.
You can set delay 5-10 for example, the messages will be sent randomly between 5 to 10 seconds later and the delay keep stacking.
fix schedule delay
fix case sensitive button reply
fix incorrect delay on schedule message
fix incorrect timezone on message history report
fix incorrect schedule status
optimize autorestart strategy
optimize connection state
optimize send message logic
You can make a form actually on whatsapp using this feature.
Submission feature work like button menu, it will be used on autoreply menu.
Most of the time, whenever you order something from small to medium business on whatsapp, you will be given a message like this :
Before you order, please fill the details below
Name :
Address :
Item :
Amount :
And then please re-send it after you fill it.
This submission feature will make the process easier for you and your customer.
First, make your own submission.
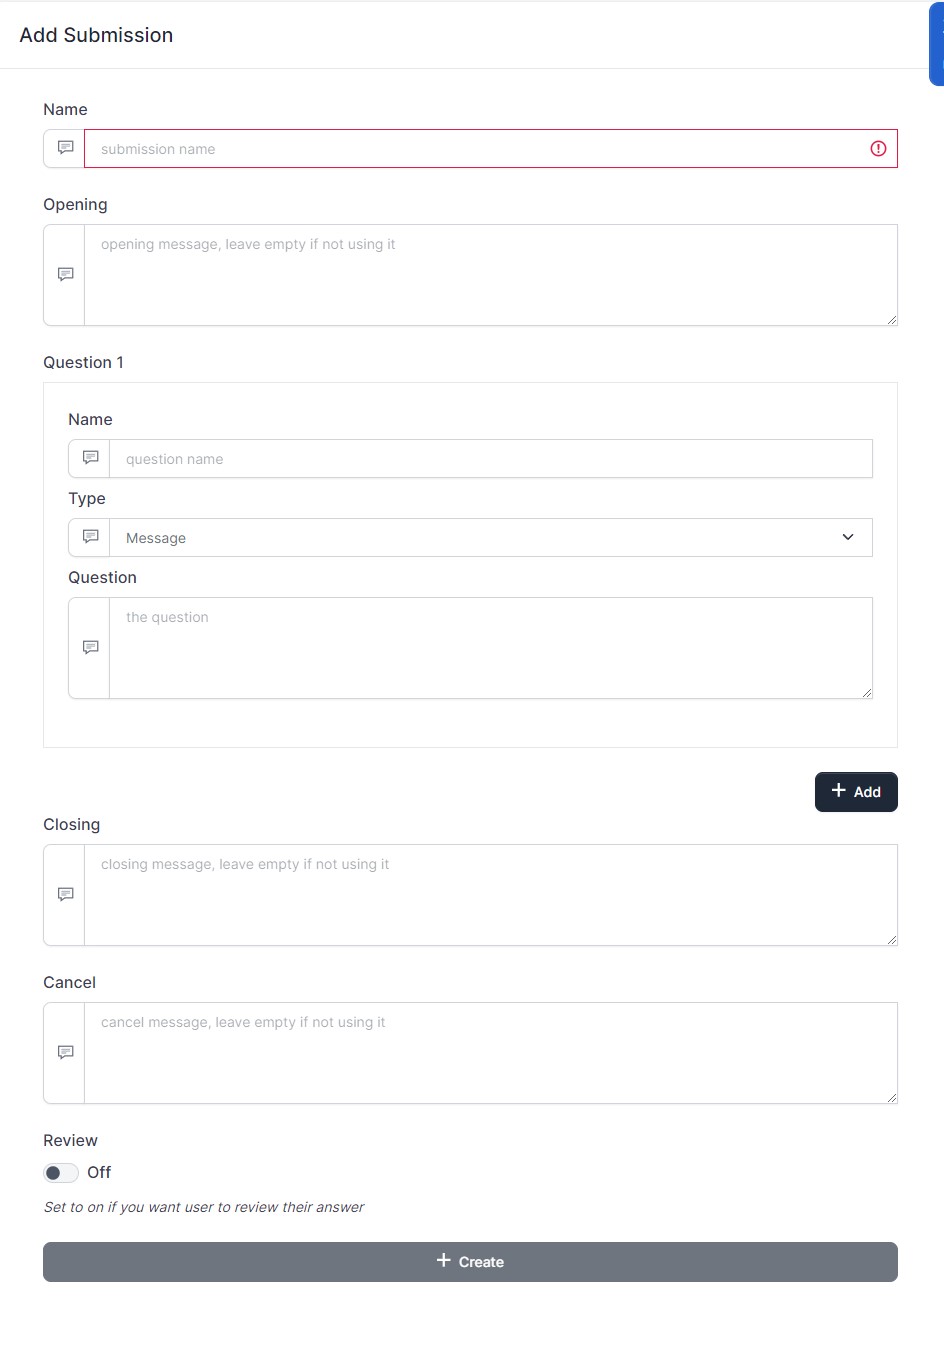
The fields of submission is shown above.
Update 31/1/2023
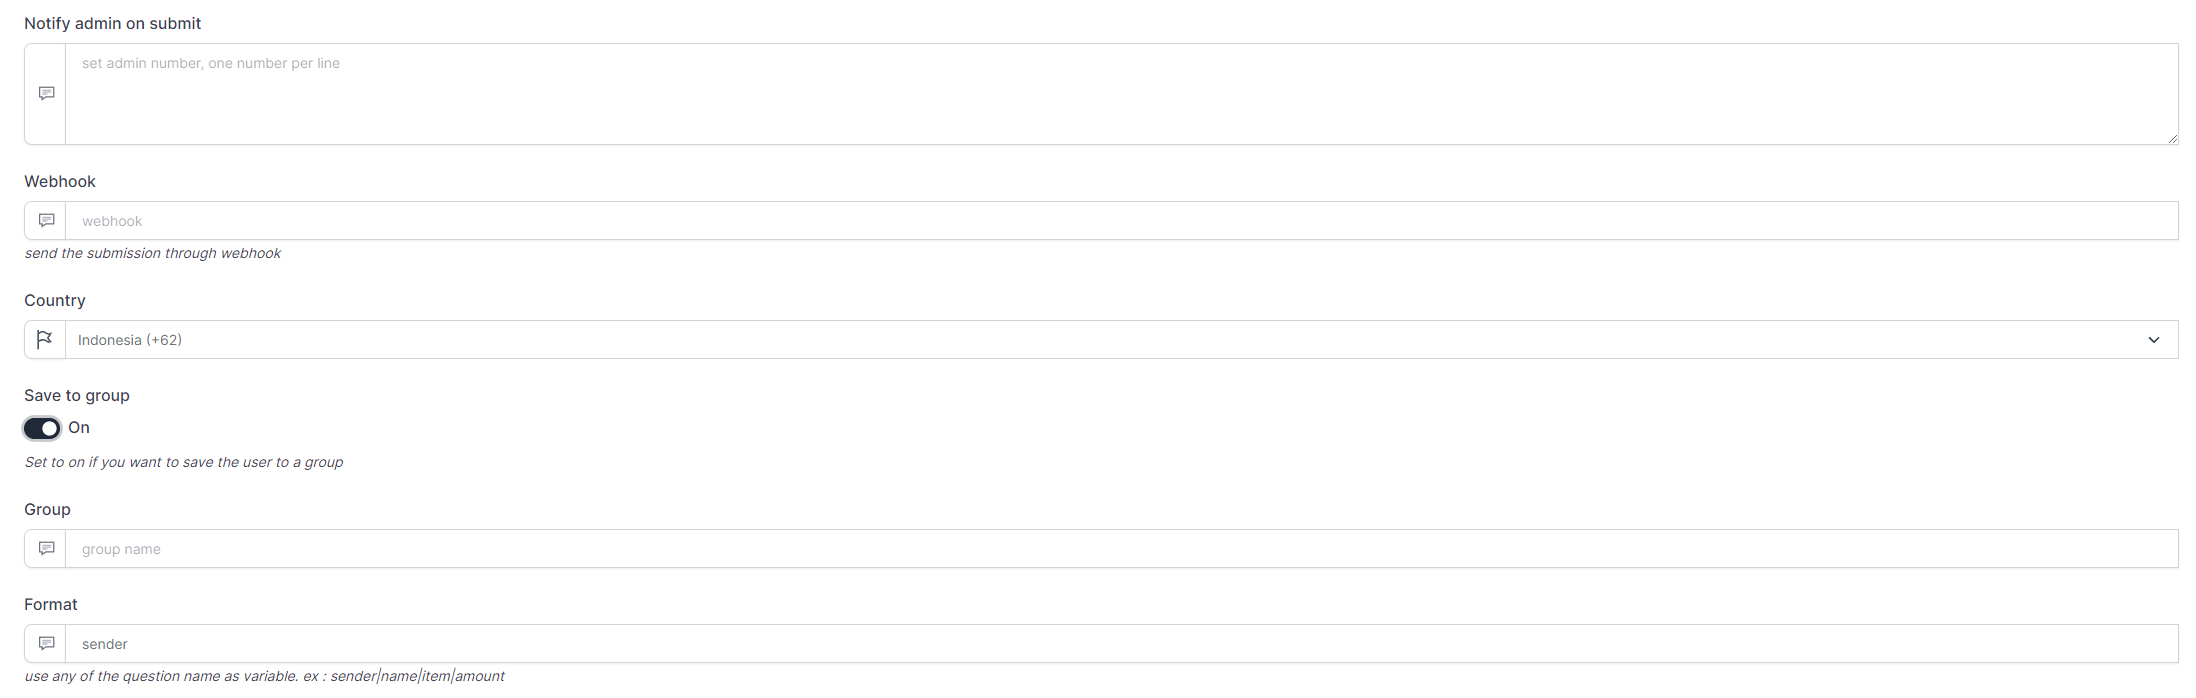
The update allow on successful submission to be sent to admin.
you can send it to multiple admin or use rotator feature.
webhook can be used for receiving the submission data to your own system.
And you can save it to a group for future usage.
after you create the submission, the submission will be shown below.
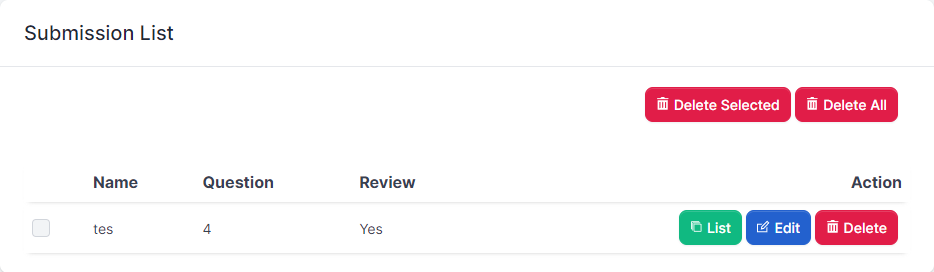
You can see the list of your customer, edit and delete the submission.
note : deleting the submission will also delete the submission list.
You can check the customer input by clicking the submission list button.
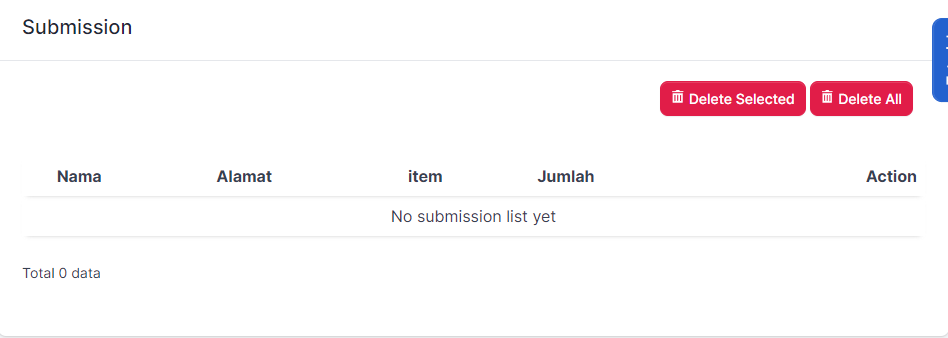
The heading is using the question name field.
That's why it's best to set the question name short.
You can delete the submission list.
We will add export feature later.
There are several message status after send message.
Every device will have their own package.
A package cannot be shared over several devices.
The package cannot be upgraded or downgraded.
A month will be count by 30 days, a year 360 days.
Your current package will be terminated if you want to upgrade or downgrade the package.
Fortunatelly, if you subscribe with the same package, your quota and expiration will be extended and added.
For example :
case 1.
Your device currently have free package with 900 quota left and expired in 20 days.
You are willing to upgrade to regular package.
Your quota will be 10.000 and expired in 30 days start from today.
The remain quota of 900 and expiration time will be terminated.
case 2.
Your device currently have regular package with 5000 quota left and expired in 10 days.
You are willing subscribe regular package again.
Your quota will be 15.000 and expired in 30 days start from expiration date, to be exact 40 days (30+10) from today.
The remain quota of 5000 and expiration time will be added.
This rules applies for all packages.
There is a limitation on how you are send and receive an attachment.
| Image | "png", "jpg", "jpeg", "webp" |
| Video | "mp4" |
| File | "pdf", "doc", "docx", "xls", "xlsx", "csv", "txt" |
| Audio | "mp3" |
| Max size | 10MB |
If you try sending attachment outside this file limitation rules, your API will return false.
For every attachment outside this file limitation rules sent to your device while using fonnte will not be sent to your webhook or forward attachment target.
Before you can send message to whatsapp group, you have to know which group to send.
To get all the group you are in, there are 2 steps to do.
First, update all of your group list.
Then, get all of your groups id list and use them as target.
This API is used to update all of your groups.
This API should called only once : when you are joining new group or never call this API yet.
<?php

$curl = curl_init();

curl_setopt_array($curl, array(
  CURLOPT_URL => 'https://api.fonnte.com/fetch-group',
  CURLOPT_RETURNTRANSFER => true,
  CURLOPT_ENCODING => '',
  CURLOPT_MAXREDIRS => 10,
  CURLOPT_TIMEOUT => 0,
  CURLOPT_FOLLOWLOCATION => true,
  CURLOPT_HTTP_VERSION => CURL_HTTP_VERSION_1_1,
  CURLOPT_CUSTOMREQUEST => 'POST',
  CURLOPT_HTTPHEADER => array(
    'Authorization: TOKEN'
  ),
));

$response = curl_exec($curl);

curl_close($curl);
echo $response;
Read more about API update whatsapp group.
Then you can use API get whatsapp group to get all the group id.
This API will give you a list of all updated whatsapp group as previously updated using API update whatsapp group list.
This API will return nothing if you have never update the whatsapp group
<?php

$curl = curl_init();

curl_setopt_array($curl, array(
  CURLOPT_URL => 'https://api.fonnte.com/get-whatsapp-group',
  CURLOPT_RETURNTRANSFER => true,
  CURLOPT_ENCODING => '',
  CURLOPT_MAXREDIRS => 10,
  CURLOPT_TIMEOUT => 0,
  CURLOPT_FOLLOWLOCATION => true,
  CURLOPT_HTTP_VERSION => CURL_HTTP_VERSION_1_1,
  CURLOPT_CUSTOMREQUEST => 'POST',
  CURLOPT_HTTPHEADER => array(
    'Authorization: TOKEN'
  ),
));

$response = curl_exec($curl);

curl_close($curl);
echo $response;
You can now get the id and the group name.
The group id will be used as target in the send message API.
The update mainly focused on working on whatsapp group to be able to send and reply plus additional preparation to read and send location with bug fixes
We are now proudly supporting send and reply message to whatsapp group.
But since we are not using whatsapp group so often, we may not knowing of exactly how it work and this feature is still labeled as beta.
If you somehow found a bug, please let us know.
This group is supported on send menu, autoreply menu, API, and webhook.
The video below is how to send message to whatsapp group using fonnte's send menu.
We are adding feature to add via import and supporting export contacts as it's always your data, not ours.
This button available on contact menu
Additional information is added to invoices menu for easier read.
Since not everyone know about fonnte's pricing, we are adding information on order popup
fix variable on button not working
fix country code & timestamp on setting/profile page
fix export webhook message as it is, not lowercased
fix contact list not show up on send menu
fix edit autoreply popup style
preparation : send location